
Holidays
Use holiday calendars to define working days and holidays for your organization on the Pismo platform. By default, the Pismo platform processes transactions every day, but you might need to restrict transactions on certain days, such as holidays, weekends, or other non-working days.
For more in-depth information, refer to the Platform setup - Holidays and administrative divisions guide.
From Control Center, you can do the following:
View holiday calendars
To view holiday calendars:
-
From the main menu, select Configurations > Holidays.
A list of holiday calendars is displayed. You can search for a specific calendar by name or tag. Tags group calendars to make them easier to find, such as all calendars for a specific city. -
Select a calendar to open its details. The Calendar details screen is displayed.
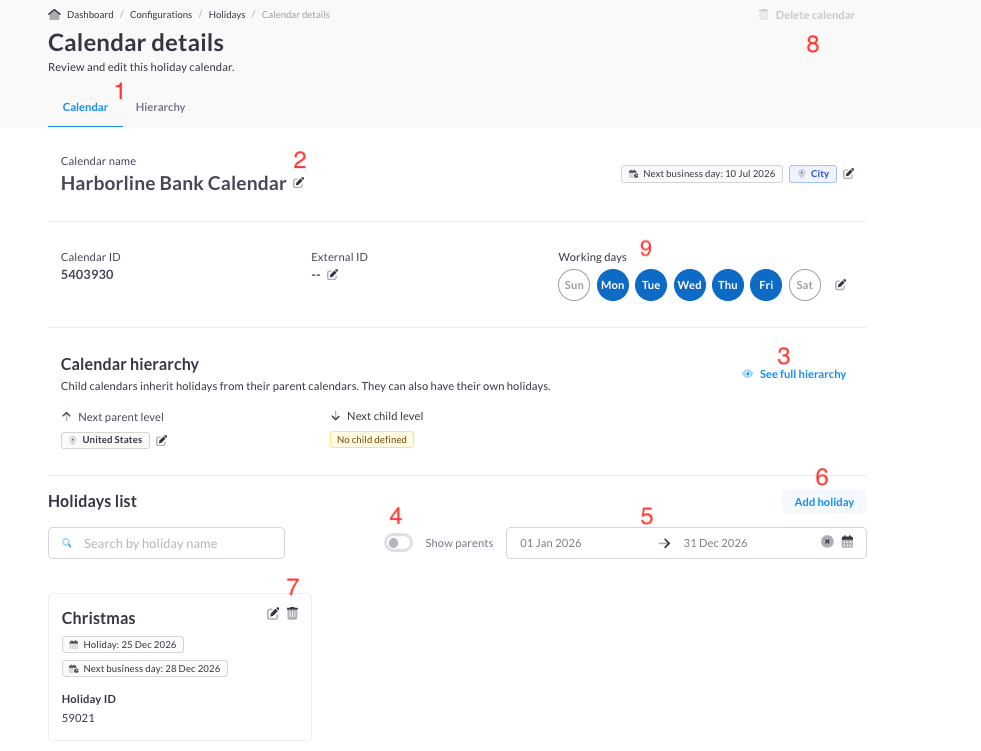
The following sections describe what you can do on this screen.
Calendar tab
On the Calendar tab, you can do the following:
| Item | Description | For more information |
|---|---|---|
| 1—Calendar and Hierarchy tabs | Switch between an overview of the holiday calendar and details about the hierarchy. | Hierarchy tab |
| 2–Edit icon | Wherever this icon appears, you can make changes. | Edit a calendar Add, edit, and delete holidays |
| 3–See full hierarchy link | View the complete calendar hierarchy screen | Hierarchy tab |
| 4–Show parents slider | Expand the list of holidays to show parent holidays | |
| 5–Date range | Show holidays in a specific date range. To show all holidays, leave the dates blank | |
| 6–Add holiday button | Add a holiday | Add, edit, and delete holidays |
| 7–Delete holiday icon | Delete a holiday | Add, edit, and delete holidays |
| 8-Delete calendar button | Delete a calendar | Delete a calendar |
| 9—Working days | Select the days of the week when transactions are allowed |
Hierarchy tab
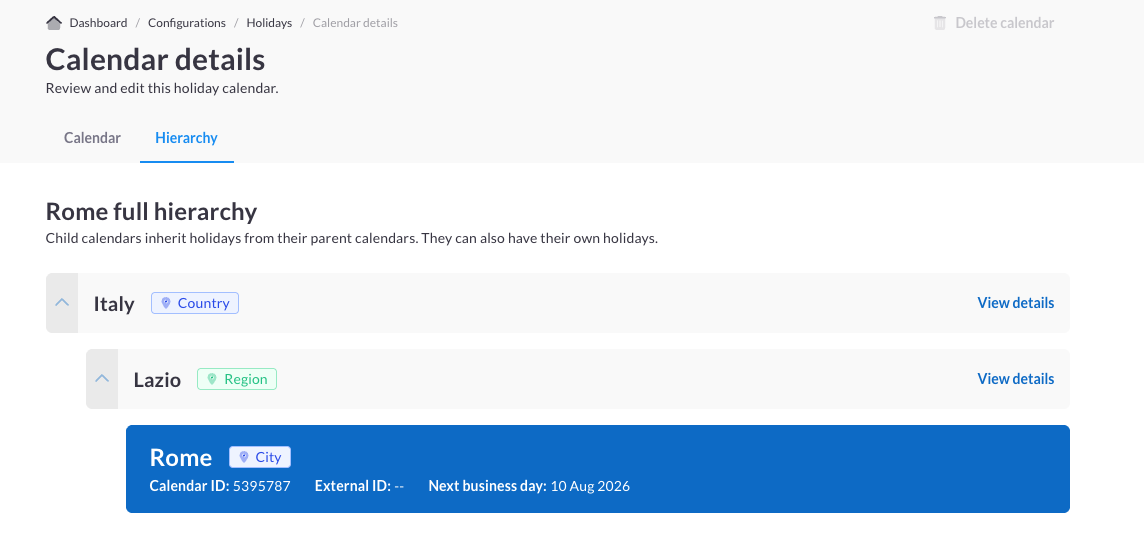
On the Hierarchy tab, you can view the hierarchy associated with a holiday calendar. A hierarchy organizes divisions—regional, organizational, and so on—into parent-child relationships. This structure allows child divisions to inherit settings from parent divisions.
In this example, Rome inherits all holidays assigned to the Lazio region, and Lazio inherits all holidays assigned to Italy. Rome can also have its own holidays specific to the city.
To view and edit an associated calendar, select View details.
Create and manage holiday calendars
You can create a new holiday calendar or import one that was previously exported from another organization or environment. For example, when promoting a configuration from sandbox to production, export the holiday calendar from the sandbox environment and import it into the production environment.
The following sections explain how to create, edit, export, and delete holiday calendars.
Create a calendar
To create a new calendar or import an existing one.
- From the main menu, select Configurations > Holidays.
The Holidays screen is displayed.

- On the Holidays screen:
- Create a new calendar—Select Create calendar and complete the wizard.
- Import an existing calendar—From the actions menu, select Import and upload a holiday calendar as a JSON file. You'll get a notification once the calendar is ready, which can take up to four hours.
Edit a calendar
Wherever the edit icon (pencil) appears, you can make changes, including:
- Calendar name—Enter a new name
- Tag—Select an existing tag or enter a new one. Tags groups calendars to make them easier to find.
- External ID—Enter an External ID, which is an identifier used to reference a resource in a system external to Pismo. It can be up to 36 characters.
- Working days—Change working days, which are the days when transactions are allowed.
- Next parent level—Select a new parent for this calendar in the hierarchy. For more information, refer to Hierarchy tab.
Export a calendar
You can export calendars and import them in another organization or environment, removing the need to manually recreate them.
To export a calendar, from the actions menu, select Export. When the export is complete, you receive a notification like the one shown here. The export file is available for download for seven days. After it expires, you'll need to export the calendar again.

Delete a calendar
To delete a calendar:
- From the main menu, select Configurations > Holidays.
- Select Delete calendar. If the button is grayed out, you can't delete the calendar because it still contains holidays or has linked parent or child calendars. Remove the holidays and unlink any related calendars, then try again.
Add, edit, and delete holidays
On the Calendar details screen, you can add holidays, edit their names, and delete them.
- Add a holiday—Select Add holidays and complete the wizard.
- Edit a holiday's name—Select the edit icon (pencil) on the holiday you want to edit.
- Delete a holiday—Select the delete icon (trash can) on the holiday you want to delete. If the icon is grayed out, you can't delete the holiday because it's either today or in the past. You can only delete future holidays.
Updated about 2 months ago