
Simulate flex control creation
This guide explains how to simulate and verify flexible transaction controls (flex controls) using Postman before applying them in production. By testing controls in a simulated environment, you can confirm that authorization rules restrict or permit transactions as expected without affecting live operations.
Prerequisites
Before starting this task, ensure you have:
- Installed Postman and imported the Pismo environment and collections as described in the Access Pismo Postman collections guide.
- A valid API client credentials pair with permissions to create accounts, issue cards, and manage flex controls.
- Reviewed the Flexible transaction controls overview guide to understand control types and evaluation logic.
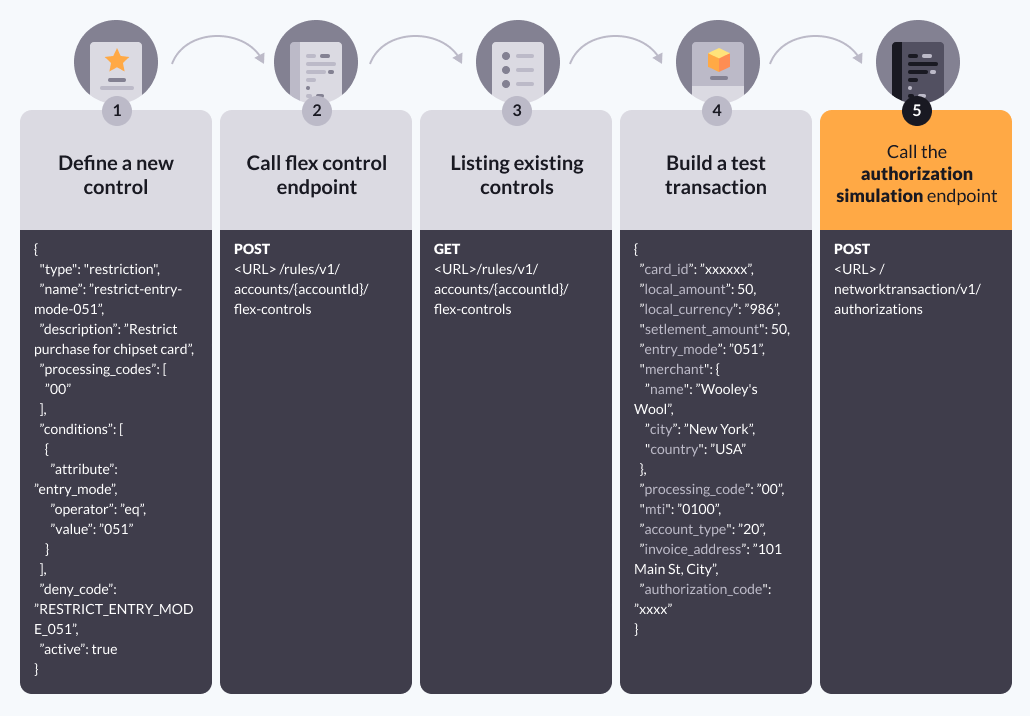
Step 1: Authenticate and set up test entities
Authenticate with the Pismo platform and create the necessary account and card entities to test against.
- In Postman, open the credit card collection.
- Select Platform > Server Authentication and send the request to generate a server access token.
- Select Platform > Acquisitions > Create an application form and send the request to generate a new test account. Save the returned
account_id. - Select Enduser > Server Login with Account and send the request to authenticate on behalf of the account.
- Select Enduser > Cards > virtual > Create virtual card and send the request to issue a virtual card. Save the returned
card_id.
Step 2: Verify baseline transaction authorization
Run a baseline transaction to verify that transactions authorize normally before applying any restrictions.
- In Postman, select Enduser > Cards > BrandedCardPurchaseSimulator > Branded authorization simulation.
- Pass the generated
card_idand test purchase details in the request payload. - Verify that the response returns
response_code: "00", confirming that the purchase is authorized without restrictions.
Step 3: Create a test flex control
Define and apply a restrictive control to evaluate against subsequent purchases.
- In the Flex controls API, call List account flex controls to list and view existing controls.
- Call the Create account flex control endpoint.
- Pass a restriction payload to block transactions where
entry_modeequals051(chip-and-PIN):{ "type": "restriction", "name": "restrict-entry-mode-051", "description": "Restrict purchase for chipset card", "processing_codes": [ "00" ], "conditions": [ { "attribute": "entry_mode", "operator": "eq", "value": "051" } ], "deny_code": "RESTRICT_ENTRY_MODE_051", "active": true } - Confirm that the endpoint returns a
201 Createdstatus with the generated controlid.
Step 4: Simulate a restricted authorization
Test that the newly applied flex control intercepts and blocks the transaction.
- Refer to Simulate authorizations for information on building a test transaction.
- Call the Simulate authorization endpoint.
{ "card_id": "12345667890", "local_amount": 50, "local_currency": "986", "settlement_amount": 50, "entry_mode": "051", "merchant": { "name": "Wolley's Wool", "city": "New York", "country": "USA" }, "processing_code": "00", "mti": "0100", "account_type": "20", "invoice_address": "101 Main St, City", "authorization_code": "123456" } - Verify that the transaction is declined.
Next steps
- Call the List account flex controls to inspect all active controls assigned to the account.
- If control parameters need adjustments, call the Update account flex control endpoint.
Related topics
Updated 20 days ago
Did this page help you?