Account configurations
Account information in Control Center is divided into the following categories:
- Account details (view only)—general account information, including its type, Pismo ID, and creation date
- Customers —customer information, including Pismo ID, document number, birth date, and gender
- Phone numbers—customer's residential, commercial, and mobile phone numbers
- Addresses—customer address details, including the primary address and any additional addresses
- Deposit products—(debit accounts only)—a list of deposit products attached to the account
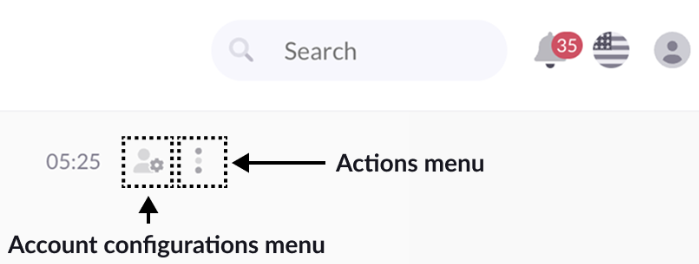
Use the Account configurations menu directs to view and modify this information, as allowed.
Customer information
You can edit some personal information for a customer in Control Center, such as their name, birth date, and marital status. However, other details are read only, such as the customer ID and document number.
For more information about customers on the Pismo platform, refer to the Core objects guide.
To edit customer information:
- On the Accounts overview page, select Account configurations > Customers.
- Select Edit.
- Modify the values in any of the following fields.
- Name
- Printed name
- Social name
- Nickname
- Birth date
- Gender
- Mother's name
- Marital status
- Select Save.
Phone numbers
Review and edit a customer's residential, commercial, and mobile phone numbers.
Adding or editing a phone number with a type that already exists replaces the current active number for that type.
Edit phone numbers
- On the Accounts overview page, select Account configurations > Customers.
- Select Edit, and modify any of the type, country code, area code, number, and extension fields.
- Select Save.
Add phone numbers
- On the Accounts overview page, select Account configurations > Customers.
- Select Add, and specify the type, country code, area code, number, and (optional) extension.
- Select Save.
Addresses
Review and edit address details, including residential, commercial, and other types. If there is more than one address currently active, you can do the following:
- Select one address to be the primary address.
- Mark an address as inactive (this change cannot be undone).
Add an address
- On the Accounts overview page, select Account configurations > Address.
- Select Add.
- Enter values for the following fields:
- Type
- Address (street name)
- Number (building number)
- Additional address information (optional)
- Province/County/Neighborhood
- City
- State
- Postal code
- Country
- Set as the primary address (optional—this applies only if there is more than one active address)
- Select Add.
Edit an address
- On the Accounts overview screen, select Account configurations > Address.
- Select Edit.
- (Optional) Select More and choose Mark inactive.
- Select More and choose Edit.
- Modify the values for the following fields, as necessary:
- Type
- Address (street name)
- Number (building number)
- Additional address information (optional)
- Province/County/Neighborhood
- City
- State
- Postal code
- Country
- Set as the primary address (optional—this applies only if there is more than one active address)
- Select Save.
Updated 4 months ago
Related pages
In addition to these actions, you can manage card information for the account.