Migrations
Migration refers to the transfer of financial products and all of their related data from your legacy, external system to the Pismo platform.
Entities that can be migrated
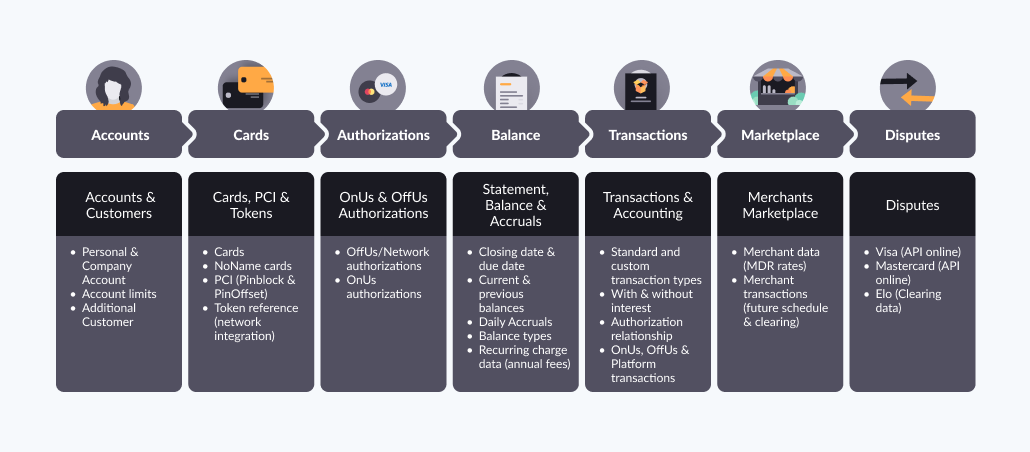
The term entity refers to a data object that can be represented on the Pismo platform, such as accounts, cards, and statements. Migration involves the following entity types and should respect this sequence here:
- Accounts
- Customers
- Cards
- PCI
- Tokens
- Authorizations (off-us and on-us)
- Statements
- Transactions
- Balance control
- Accruals
- Recurring charges
- Marketplaces and merchants
- Disputes
- Go-Live and Pre-Go-Live
Migration entities by line of business
The following table lists which entities to migrate depending on your line of business.
| To migrate ... | Use these Migration APIs … |
|---|---|
| Bank accounts |
|
| Prepaid cards |
|
| Full balance credit cards |
|
| Retail/On-us |
|
The following diagram shows the relationships between accounts, customers and cards.

Accounts
An account on the Pismo platform represents a financial service provider's account. Each account is contained within a program, and the account’s type (such as credit, debit, or prepaid) is determined by the type of program that contains it. Accounts have balances and credit limits as attributes.
Important points
- Accounts also contain customer information, including their addresses and phone numbers, and any cards issued for the account. Every account must be created with one customer, who serves as the account holder.
- Multiple customers can share one account.
- An account can have multiple customers, and a customer can belong to multiple accounts.
- An account may issue several cards to its customers, all of which draw from the same account balance.
- You can migrate canceled or inactive credit accounts, but only for the purpose of migrating canceled cards.
- All accounts using the same BIN must be migrated during the same migration phase. This means that they should all have the
phase_ID.
Customers
Customer information includes their document number, addresses, and phone numbers. Accounts also include information about any cards issued for the account.
Important points
- All customers for the same account must be migrated during the same migration phase. This means that they should all have the
phase_ID.- Customers are added only with the Accounts API.
Cards
All cards must be associated with an account, except for noname cards (which are for special use cases, like gift cards). Card data includes the card name, status, type, issue date, and expiration date.
Important points
- You can migrate both physical and virtual card types.
- You should migrate cards of all statuses, including the canceled ones, to ensure the integrity of Primary Account Numbers (PANs).
Migrating combo cards
The term combo card refers to a card that can be used in either credit and debit mode. When migrating a combo card Both accounts must be registered to the same document_number, which identifies their owner on the Pismo platform. For more information, refer to Create a combination card with card modes.
To migrate a combo card
- Migrate the credit account (Account A):
document number = 123andmigrationId = abc. - Migrate the debit account (Account B):
document number = 123andmigrationId = def. - Migrate the card (id = 123 and mode = COMBO):
- For Account A (the credit account):
mode = COMBOmigration.accountId = abcmigration.cardId = 123migration.combo_account_id = def
- For Account B (the debit account):
mode = COMBOmigration.accountId = defmigration.cardId = 123migration.combo_account_id = abc.
- For Account A (the credit account):
To migrate a combo card that has only one mode activated, you can migrate either the debit or credit account first, together with the card (type COMBO).After Go-Live, it’s possible to activate the other mode separately, using the Add card mode endpoint.
PCI
PCI (Payment Card Industry) refers to sensitive information related to payment cards that require extra security measures to protect it. This includes data such as the Primary Account Number (PAN), Service code for Card Verification Value (CVV2), and security passcode (PIN using PinOffset or Pinblock format).
Pismo migration APIs and workers are PCI compliant. There is an exclusive bucket for PCI data. PCI file encryption by either native AWS KMS key or PGP key). During the migration of PCI-sensitive information, you can use our PCI specific migration API or send using files through SFTP.
Important points
- PCI file encryption by either native AWS KMS key or PGP key. The PGP public key needs to be shared between Pismo and the issuer.
- For PCI data, the exchange of HSM keys between Pismo and the processor is important.
Tokens
In the context of card network transactions, a token is a substitute value used to replace sensitive card information. This is a unique identifier that can’t be reverse engineered to reveal the original card information. This process is known as tokenization.
A tokenized PAN is used for online purchases (using digital wallets like GooglePay, ApplePay, SamsungPay) or to store payment-card information for an online merchant. Data for tokens includes the token ID, expiration date, status, and wallet ID.
Authorizations (off-us and on-us)
Authorization refers to the process of validating transactions based on a set of predefined rules. It is a record stating that a given amount was authorized for an account deposit or withdrawal. It contains information about its nature, such as the amount, local currency, date and time, and applicable fees.
Authorizations can be either:
- Off-us (also known as network authorizations): Authorizations generated by a third-party issuer, usually a card network such as Visa, Mastercard, or Elo. A network authorization must specify the associated account and card.
- On-us: Authorizations generated for you by Pismo acting as the issuer, as for private label cards.
Data for Off-us authorizations includes, for example, account, card, authorization date/hour, amount, authorization code, and status.
Important points
- You can migrate up to six months of Off-us authorization history.
- PENDING status authorizations are required.
Statements
A statement is a collection of charge and fee balances that results from credit card transactions. Statement data includes account ID, cycle closing date, due date, initial and final balances after any accrued balances are applied. You can migrate up to six months of statement history.
Statements are ordered through their cycle number, and every new account has a moving window of 120 cycles. The platform updates the debits, credits, and resulting balances in real time for each new transaction as it occurs.
The minimum amount due (MAD) is calculated at the cycle closing date, and the platform assigns an open due date to the account, marking the first day of debt in cases of default. Balances are calculated according to transaction balances and are managed at either the program or account level.
Important points
- A statement must specify its associated account ID.
- Only closed statements are migrated—current statements (as of the migration date) and future statements are generated by the Pismo platform.
- A statement ID is required for credit accounts.
Transactions
Transaction data includes date, amount, authorization code, transaction type, merchant data, and interest rate. You can migrate up to six months of transaction history, but it’s recommended to migrate all the installments history. It is not necessary to migrate transaction history for canceled accounts.
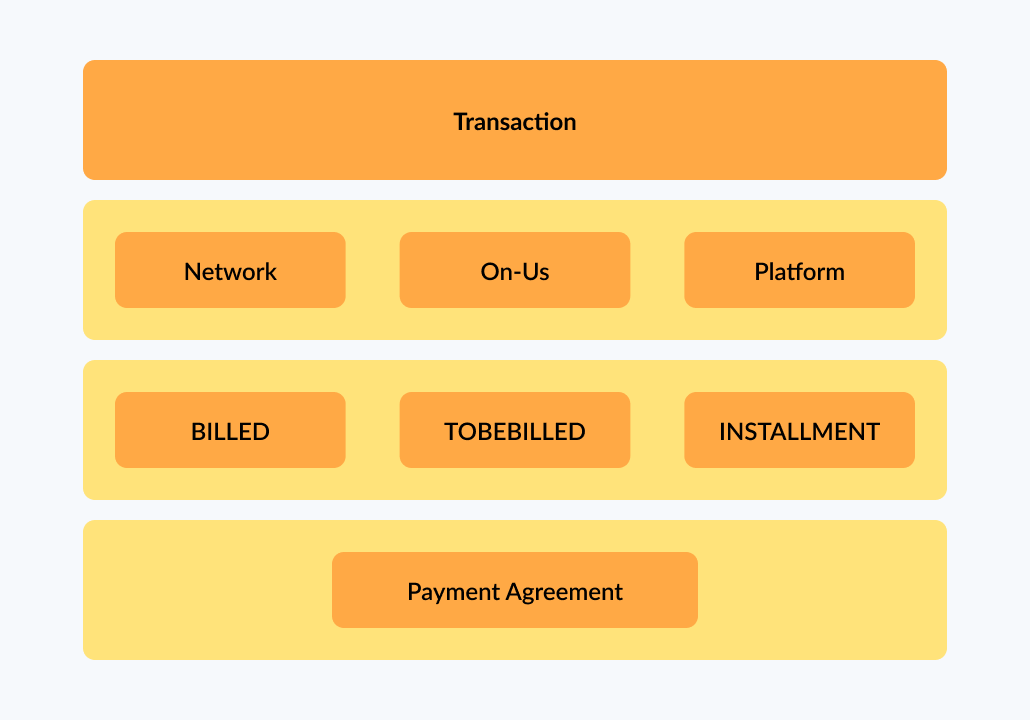
You can migrate the following different types of transactions:
- Billing type:
- BILLED: For credit accounts, this refers to transactions that belong to a closed statement. For debit accounts, you can always send with this type.
- TO_BE_BILLED: Credit accounts refer to transactions that belong to the currently open statement. For Debit accounts, this does not apply.
- INSTALLMENTS: For credit accounts, this refers to transactions/installments that belong to future statements. For debit accounts, this does not apply.
- Authorization type:
- NETWORK: For credit accounts only, refers to transactions authorized by the network like Visa, Mastercard, Elo. Example: purchase, installments with/without interest.
- ON US: For private label cards/accounts, refers to transactions authorized by an issuer’s internal network. Example: purchase, installments (with or without interest).
- PLATFORM: For credit accounts, refers to transactions generated by an internal system, like payments, credit or debit adjustments, fine/overdue transactions. For debit accounts, refers to banking transactions, like payments, adjustments, P2P transfers, cashin/cashouts transfers.
- BANKING: For debit accounts, refers to Pix instant payments transactions, where information related to Pix is needed.
- PAYMENT AGREEMENT: For credit card refinancing products. Refers to:
- Statement agreement: Customer renegotiates all pending pending debt for all their statements.
- Installment agreement: Customer agrees to settle the amount over the next few bills (the outstanding amount is added to the statement for the following month.
Important points
- During the migration process you cannot add transactions to an account.
- A transaction must be linked to an account.
- A network transaction also must include the associated card and an authorization.
- Examples of transaction types include on-us and network transactions (purchases, cancellations, and chargebacks), and platform transactions (adjustments, fees, and interest.
- Payment agreements (such as credit card refinancing agreements) are migrated together with the transaction.
- For installments with interest, additional data in transactions migration might be required.
Balance control
Balance controls ensure accurate initialization and ongoing management of balances when you transfer accounts from a legacy processor to the Pismo platform.
These balances include purchases, fees, charges, penalties, and other amounts cardholders owe. When you initiate balance control migration, the total of all balance amounts must match the balance shown on the latest due statement at go-live.
If balance control and go-live occur at different times, use the go_live_date field to identify the latest due statement.
To migrate control data, use the Migrate balances endpoint. This gives you full control over how balances are split across balance types (accruable, fineable, or neither).
You can also migrate balance control data using files. If needed, the Pismo platform can generate balance control data on your behalf. This option requires additional configuration, so coordinate with your Pismo representative.
When the Pismo platform generates balance control data automatically, it assigns a single balance type:
- accruable_fineable for debit balances
- credit for credit balances
When the platform generates balance control data, you cannot split balances across multiple balance types. Refer to Balance control transaction types for more ninformation.
Balance control transaction types
A balance is considered accruable when it is eligible to accumulate interest. A balance is considered fineable when a late payment is eligible for a penalty and is fined once at the time it is originally posted to an account.
Most accounts fall under no more than two transaction types at the same time. For example, it could be one of the following:
- accruable_fineable + notaccruable_fable (or)
- accruable_notfineable + notaccruable_notfineable
This prevents inconsistencies and reflects typical business rules. Ultimately, when migrating balances, all transaction types must be configured. Refer to Setting transaction types to block accrual charges for more information.
Balance control is categorized according to these transaction types:
Balance control transaction type | Description |
|---|---|
ACCRUABLE_FINEABLE | This applies to new, unpaid balances that accrue interest and are subject to receiving a fine. This transaction type should not be applied to accounts between cycle closing and the cycle closing due date. This balance type accrues charges and interest. |
ACCRUABLE_NOTFINEABLE (TT 6902) | This applies to older balances that still accrue interest but are no longer fined (already fined in a previous cycle). |
NOTACCRUABLE_FINEABLE (TT 6903) | This applies to balances that do not accrue interest but can receive a fine. This transaction type should not be applied to accounts between cycle closing and the cycle due date. |
NOTACCRUABLE_NOTFINEABLE (TT 6904) | This applies to balances that do not accrue interest or receive fines (for example, insurance or annual fees). This is common for balances between a cycle closing and cycle due date. |
CREDIT (TT 6905) | This applies to credit balances. These cannot be combined with other balance types or used for retroactive accruals. |
Note: Programs or accounts that migrate balances under the CREDIT transaction type require additional Pismo platform configuration. You must also specify the rate percentage for each CREDIT program. To enable the proper configurations, contact your Pismo representative. Complete these configurations before migration.
The sum of all migrated balance controls for one account must match the M-1 statement current balance if the account migration is between the cycle due date and cycle closing date. The sum of all migrated balance controls for one account must match the M-2 statement current balance if the account is between the cycle closing date and cycle due date.
During migration, the sum of all balance controls for an account must reconcile to the latest due statement:
- Use the M‑1 statement if migration occurs between the cycle due date and the next cycle closing date.
- Use the M‑2 statement if migration occurs between the cycle closing date and the next cycle due date.
Important pointsM‑1 refers to the most recent closed statement prior to the current open statement (M). M‑2 refers to the statement closed two cycles before the current open statement.
Accruals
Accruals are charges that accumulate on an unpaid balance during a credit cycle. They are posted as transactions on an account and increase the total amount due. Accrual charges can consist of:
- Revolving interest
- Late-payment fines
- Interest on cash withdrawals
- Other issuer-defined charges
For instances where the customer’s processor calculates daily accruals and the minimum statement balance has not been paid, use the Migrate accruals endpoint to initiate the accruals migration process. In order to do this, it’s important the customer provide the total calculated accrual amount to avoid revenue loss.
For accounts migrated between a cycle closing date and cycle due date, you can migrate projected accruals calculated by the legacy processor between the period from the M-1 statement cycle closing date +1 (D+1) until M-1 statement due date. If a payment is made on or before the statement due date, projected accruals are not applied. Refer to Projected accruals for more information.
After the due date, the Pismo platform applies daily accrual calculations and adds them to the projected amounts to determine total accrual charges for the billing cycle.
The accrual migration period depends on the timeframe in which the customer initiates the migration cycle (cycle closing and due date, or between due date and closing date).
For accounts migrated between cycle due date and cycle closing date , you can migrate pending accruals calculated by the legacy processor between M-1 statement due date +1 until the go-live date. These accruals are temporary and are posted at the next cycle closing date.
If accruals were already applied, the Pismo platform can issue a refund. If the legacy processor does not supply accruals, the platform calculates them retroactively.
Accrual types
Pismo supports the following accrual types:
| Accrual type | Description |
|---|---|
| Overdue | This accrual type applies a daily charge to unpaid balances when the minimum amount due (MAD) or the full statement balance is not paid. It is migrated only for overdue accounts. |
| Refinancing | This accrual type applies a daily charge to an unpaid balance if the total amount due has not been paid. |
| IOF | This accrual type is applicable only in Brazil |
| Fine | This accrual type applies a one-time charge on the day the account becomes overdue, when the minimum amount due (MAD) is not paid. It is migrated only for overdue accounts. |
The customer must confirm the rate percentage for each accrual type. The platform applies these rates based on the accrual type and posts them as transactions in the next cycle closing period, if the account remains overdue after go-live. For detailed examples of how accrual balances, charges, and fees are posted during migration, refer to the Choose a migration scenario section.
Balance and accruals migration
Balance and accruals migration lets you transfer balances and interest-related charges from your legacy processor to the Pismo platform. This ensures continuity of revenue and preserves customer data during migration. You have the option to migrate accruals and balance controls, or allow the Pismo platform to automate the account charges and balances for you.
Choose a migration scenario
Choose one of four migration scenarios based on your data quality and migration strategy.
Scenario 1: Migrate accruals and balance controls
calculate_retroactive_accruals = false
You send pending accruals and balance control data to the Pismo platform. The platform uses your values and does not calculate retroactive accruals.
Use this scenario under the following conditions:
- You need the highest possible accuracy
- Your legacy processor can export accrual values
Scenario 2: Migrate balance controls only
calculate_retroactive_accruals = true
You send balance control data only. The Pismo platform calculates retroactive accruals based on the balances you provide.
Use this scenario under the following conditions:
- Your legacy processor cannot export accruals reliably
- You can ensure accurate balance control data
Scenario 3: Migrate accruals only
You send accruals but do not migrate balance control data. Pismo generates a single balance type, depending on the account setup (for example, accruable_fineable or credit). Use this scenario when your balances are extremely simple and do not need to be split into multiple types.
Scenario 4: Do not migrate accruals or balance control
calculate_retroactive_accruals = true
You do not send balance or accrual data. The Pismo platform generates all balances and calculates all retroactive accruals for you.
Use this scenario under the following conditions:
- Your portfolio is simple
- Accounts have little to no revolving interest
Sample migration scenario
Suppose a customer account is migrated across multiple statement periods. The go-live date occurs:
- Between the cycle closing date and the statement due date, (or)
- Between the statement due date and the next cycle closing date
As illustrated in this example, balances, fees, and accrual charges are handled differently depending on where the account is in the billing cycle at the time of go-live.
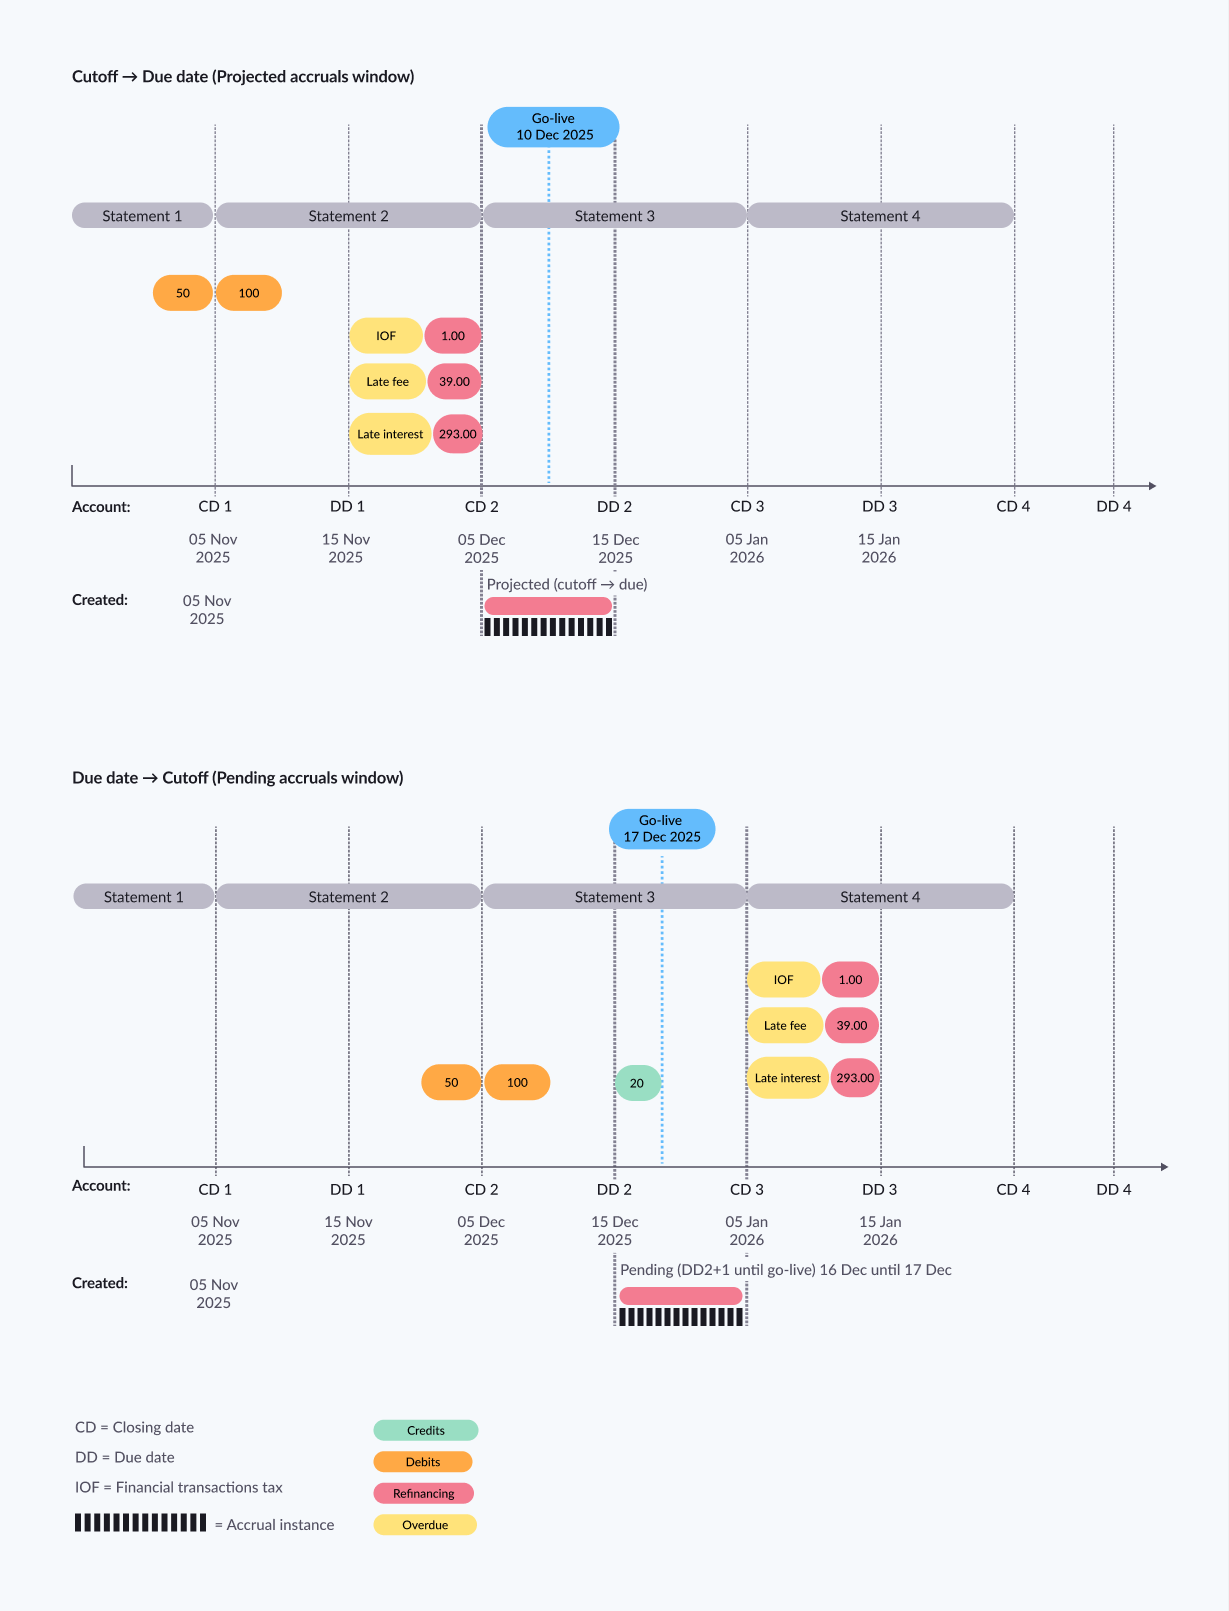
When go-live occurs between the cycle closing date (cutoff) and the statement due date, the account falls under the projected accruals window. Accrual charges expected from the cutoff through the due date are pre‑calculated on the legacy processor and migrated as projected accruals.
When go-live occurs after the due date but before the next cycle closing date, the account falls under the pending accruals window. Accrual charges calculated from the due date through the go-live date are migrated as pending accruals and are posted at the next cutoff.
Across both timelines, statement debits, credits (payments), and billed fees (such as late fees, IOF tax, or previously billed interest) remain tied to their original statement cycles, while accrual instance (projected or pending) represents charges specifically within the migration window.
The following table walks through this same account example (as illustrated in this example) —showing how balance controls, billed fees, projected accruals, and pending accruals interact depending on the timing of go-live relative to the cutoff and due date.
Account closing date (CD) or due date (DD) | Calculated balances/accrual charges (as ) |
|---|---|
Statement 1 — Cycle closing/Cutoff (CD1) | Balance controls/statement components
These statement debits carry into later windows, where projected or pending accruals may apply depending on the go-live date. |
Statement 2 — Cycle closing/Cutoff (CD2) | Balance controls/statement components
Fees/taxes billed on the statement:
|
Projected accruals window — Go-live occurs between Cutoff and Due date | Projected accruals (Cutoff → Due date) and projected values to migrate (already calculated by the legacy processor):
This represents the projected charges expected to accrue from cutoff until the statement due date because go-live occurs inside that window. |
Statement 2 — Statement balance due (DD2) | Boundary between windows This is the end of the projected window (Cutoff → Due date) and the start of the pending window (Due date → Cutoff) if the balance remains unpaid. |
Pending accruals window — Go-live occurs after Due date but before the next Cutoff | Pending accruals (Due date → Go-live, posted at next cutoff) Pending accruals to migrate (already calculated from due date through go-live):
This represents charges accumulating after the statement due date, calculated on the legacy processor until go-live, then posted on-platform at the next cutoff. |
Statement 3 — Next cycle closing/Cutoff (CD3) | This cutoff is the next anchor where the migrated pending accruals are reflected/posted (based off the image). |
Recurring charge plans
Recurring charge plans define charges that automatically occur at a regular interval, such as monthly or annually. Examples include subscriptions for services like streaming platforms, gym memberships, or software subscriptions. Attributes of a recurring charge plan include processing code, installment amount, description, and number of cycles.
To use a recurring charge a plan, you must first create it (or reuse one that already exists on the platform) and then link it to an account. A recurring charge link is an ID that links an account to a recurring charge plan. Recurring charge link data includes plan ID, account ID, and number of installments. Once linked, the plan is automatically activated, and the account can begin incurring charges based on the plan settings.
Important points
- One plan can be linked to multiple accounts, and one account can be linked to multiple plans.
- An account can even be linked to the same plan multiple times, as long as each link has a different
tracking_id.- You can deactivate a plan for a specific account by removing the link between them or disable the plan altogether.
Marketplaces and merchants
A marketplace is a grouping of merchants who sell their products in the same online forum or physical point of sale. The marketplace deducts a fee from each sale. It is the top entity in the hierarchy of objects that make up your digital marketplace. You can create a Marketplace object and customize it to suit your business needs. It can represent a single merchant or a group of merchants that share the same tax structure and setup. Additionally, it enables you to set up a schedule to handle settlements for all the merchants that belong to the marketplace.
Merchants
Merchants are individuals or businesses that sell products or services within a marketplace. Each merchant has a schedule and a register of transactions in the Marketplace object. Merchants can be linked to one or more marketplaces, and their accounts receive funds from sales during the settlement process. The Merchant object includes marketplace ID, address, and creditor configurations. For more information, refer to Seller management overview.
Merchant transactions
Merchant transactions are records of purchases, transfers, payments, or manual adjustments. These transactions are triggered by approved authorizations and are the end result of a financial operation. A financial operation can include activities such as withdrawals, purchases, payments, cash-ins, or transfers. The authorization step performs several validations, including checking if the account or card is valid, if the operation is allowed based on configured transaction flex controls, if the account limits are within the allowable range, and if there is any fraudulent activity. If the authorization succeeds, the platform updates the customer timeline and may affect the credit limit or account balance depending on the type of program (credit, debit, or prepaid).
Merchant transactions can be of different types, either debit or credit, and may affect bank or credit card statements. Some transaction types also have accounting implications. The Pismo platform supports various types of financial operations, including peer-to-peer transfers, card network operations, and purchases. The platform uses configured processing codes and their mappings to transaction types to generate transactions.
Disputes
A dispute occurs when a cardholder requests a cancellation or refund for an unrecognized or suspicious transaction. The process involves the cardholder notifying the card issuer, who then makes dispute API calls to the Pismo platform. Pismo opens the dispute with the card network and informs the issuer and cardholder about the dispute status once there is a response from the network. If the issuer loses the dispute, they can either accept the loss or file a case with the card network.
Timeline and steps
You can migrate data on any schedule you prefer. Typically, the migration process is divided into steps. As an example, you can schedule your migration project to occur over 15 days and divide the work into three steps, as follows:
| Steps | Days | Migrated entities |
|---|---|---|
| 1 | Days 1 - 9 |
|
| 2 | Days 10 - 14 |
|
| 3 | Day 14 - 15 (D-0) |
|
When using the Go-Live endpoint, every migrated account that has been assigned the specified phase ID has its status changed to MIGRATED.
Prerequisites
You must complete the following tasks before you can migrate data to the Pismo platform:
- Create your Org and programs on the Pismo platform.
- Configure processing codes and transaction types.
- Configure program transaction categories.
- Key ceremony (for migration keys).
- Configure SFTP and Amazon S3 cloud storage bucket for file migration.
Migration methods
There are two methods for migrating your data to the Pismo platform:
- Use Pismo's Migrations API.
- Upload files using SFTP to a dedicated Amazon S3 cloud storage bucket (provided by your Pismo representative).
Migration using the API
You must consult your Pismo representative to receive access to the Migrations API.
For information about authentication to the Migrations API, see Authentication with OpenID Connect.
Migration using file upload
Files must be formatted according to templates provided by your Pismo representative. The template files are provided in XLSX format for ease of use. But you must save the results in CSV format. An SFTP configuration is required to upload the CSV files to the S3 container (container details are provided by your Pismo representative).
The following example shows a snippet of data from a typical migration file.
01,PCI,2022-12-15,22:38:28,000032184
02,PCI,0W431L4PUEGTJJ5DW4C,2022-12-15T22:38:28.00000Z,,000,4642950127683540,0,0
02,PCI,IV12Y7KQ0GJSO3V5JZA,2022-12-15T22:38:28.00000Z,,000,4642957650184234,0,0
02,PCI,TL7CEJ9DTRT6ZK3CWD4,2022-12-15T22:38:28.00000Z,,000,4642958421673505,0,0
02,PCI,WGUZZKBT00PT04NXTBR,2022-12-15T22:38:28.00000Z,,000,4642957281560349,0,0
02,PCI,6VNUMLRXHIY33S4B47U,2022-12-15T22:38:28.00000Z,,000,4642951732054861,0,0
02,PCI,509V934V9NVQE2L5X2W,2022-12-15T22:38:28.00000Z,,000,4642951327640587,0,0
								 . . .
02,PCI,FGESA33KJ47ZRY6CS1E,2022-12-15T22:38:28.00000Z,,000,4642952750416834,0,0
99,000000250
Note the following:
- The first line represents the header section of the template.
- Each subsequent line corresponds to an entity that you want to migrate.
- The last line is a trailer containing the total number of records.
To migrate a product using a file:
- Open the template for each product type you want to migrate. For example:
- For authorizations, use template_authorizations (en).xlsx.
- To migrate card data, use template_cards (en).xlsx.
- Add the information specified in the template and save the result as a CSV file.
- When you finish with your CSV files, contact your customer representative to request an Amazon S3 cloud storage bucket to hold them. This bucket should contain a subfolder for each product type (for example: /cards and /pciCards).
- Upload your CSV files to the appropriate Amazon S3 cloud storage bucket or SFTP.
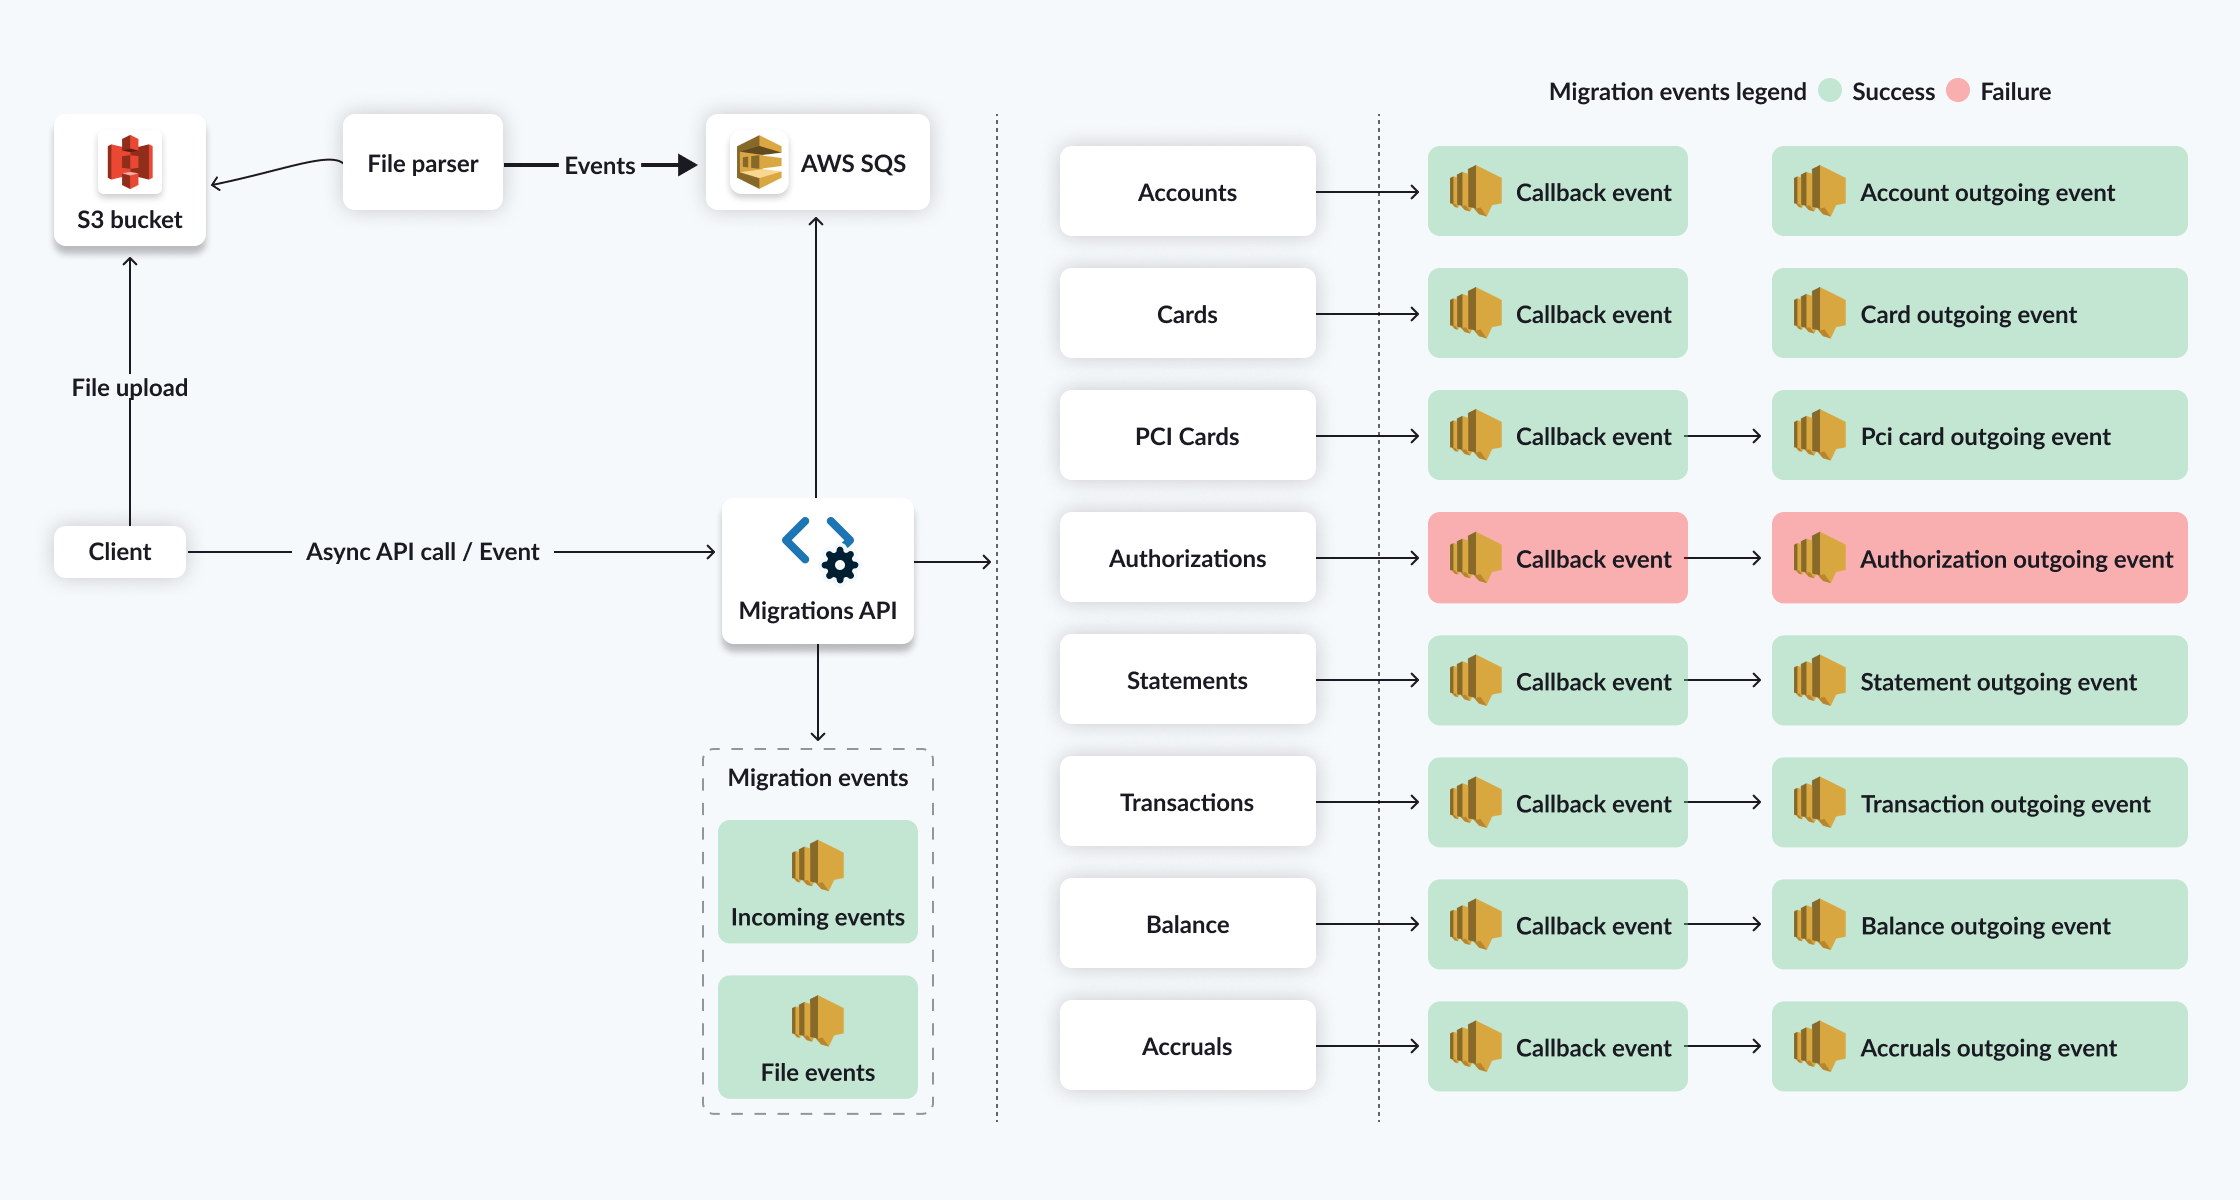
Migration data events
Every migrated entity generates an event that is processed asynchronously. Event data includes the migration ID and the various entity type IDs. For example, when you migrate an account, the generated event includes the account migration ID, the account ID, and the customer ID.
IdempotencyYou must set a unique migration ID and migration date for every entity to be migrated. For accounts, you also must specify the
phase_ID. These factors help ensure idempotency (no duplication of entities). To update an entity, you must send the same migration ID plus a migration date that is later the current migration date.
Migration events are sent for every entity. There are three types:
- Incoming events: Includes all the data sent to migration endpoints or files. Example: Account migration started.
- Outgoing events: These events also report whether or not the migration was successful. If the migration fails, the event includes an error code and message. Example: Account migration completed.
- File events: Used to indicate failures when migrating a specific entity (represented by a line in the CSV file). If an entity migration fails, the platform generates a
file_unparseable_lineevent item, which identifies which line had a problem. After a file processes, the Pismo platform generates afile_summaryevent. This event includes the file name, status, number of processed lines, and number of failed lines.
Go-Live and Pre-Go-Live
In the context of the Pismo platform, Go-Live refers to the point at which your migrated entities become fully operational and available for use by customers. The Migrations API provides a two-step process that can handle situations before running the Go-Live itself. Use the go_live_date field to determine which account statement should be used to validate that the balances match. As an extra precaution, there is also a Pre-Go-Live step that you can use to simulate Go-Live. Pre-Go-Live is a REQUIRED step and should only be sent for credit program accounts.
Go-Live endpoint
Go-Live changes the migration status of the accounts to MIGRATED after all details have been confirmed, and starts the accounting generation for credit accounts only.
Calling this endpoint blocks further account changes.
Go-Live triggers the following actions for every account to which you assigned to a specific phase ID:
- Changes the
account_statusfield from its original value (usuallySTAND-BY) toNORMAL, which is the status sent on thego_live_account_statusfield upon an account’s migration). - Changes the
migration_statusfield value toMIGRATED, which indicates that the account has become active on the Pismo platform. (The Pre-Go-Live endpoint omits this step.)
Go-Live for accounts should be performed together with the Go-Live for networks.
Pre-Go-Live endpoint
Pre-Go-Live does not change the status of an account. It only generates a Pre-Go-Live migration completed data event for each account as either SUCCESS or FAIL.
Pre-Go-Live is a REQUIRED step and should only be sent for credit program accounts.
Calling this endpoint triggers the following actions for every account to which you assign a specific phase ID:
- Update of transaction balances (for non-due transactions).
- Discharge of transactions (following the payment hierarchy).
- Calculate the accruals retroactively (sent on balance control migration).
- Update the account’s OpenDueDate field.
Rollback
After Go-Live, rollback is possible only for certain entities:
- Transactions (soft-delete rollback)
- Statements (soft-delete rollback)
- Network/off-us authorizations (soft-delete rollback)
- On-us authorizations (soft-delete rollback)
However, rollback cannot be done for accounts after Go-Live. This is because activated accounts generate new data, including authorizations and accruals. Go-Live also enables the accounting and regulatory processes to be started on the Pismo platform).
In a validation/test environment, rollback can be used freely, but use caution in a production environment.
Updated 5 days ago