Get started with SSO for Control Center
An optional package allows clients to add Single Sign-On (SSO) authentication to Control Center for a fee. This gives you the ability to have your organization’s users sign in to Pismo Control Center through an Identity Provider (IdP) using a single set of credentials. Pismo supports SSO with the Security Assertion Markup Language (SAML) 2.0 protocol. Any identity provider that supports SAML 2.0 works with Pismo. The advantage of this is that your IdP acts as a trusted service that manages user accounts and their authentication.
Single sign-on (SSO) is only available to customers who have purchased it. Contact your Pismo representative for more information.
How SSO with SAML work with Control Center
This is the basic log in and authentication flow when a user accesses the Pismo Control Center with SAML SSO configured:
- User navigates to Control Center to login using SSO.
- User enters their email address and Control Center determines if this email domain uses an SSO profile to authenticate. If the email domain has a rule to use SSO, the SAML request for login is sent to the identity provider (IdP).
- User logs in to the IdP.
- The IdP prepares a SAML response and sends it to the user's browser.
- The IdP posts the SAML response to Control Center, and the user is directed to their unique Control Center homepage.
Configure SSO for SAML
Before you start your configuration, you must ensure your IdP supports SAML 2.0.
If you are unfamiliar with SSO or SAML, refer to the Terms to know section before proceeding with the configuration steps.
Step 1: Set up your identity provider (IdP)
-
Log in to your IdP admin console—access your IdP (e.g., Okta, OneLogin, Entra ID, Google Workspace, etc.).
-
Create a new SAML application—create an application in your IdP that represents the relationship between Control Center and your IdP.
- Navigate to the console section where you can add a new application.
- Select SAML-based authentication.
-
Configure basic application settings.
-
Provide a name and description for the SAML application.
-
Optionally, upload a logo for easier identification.
-
Configure SAML Settings—you will see a screen like this (actual layout is dependent on your chosen IdP):
-
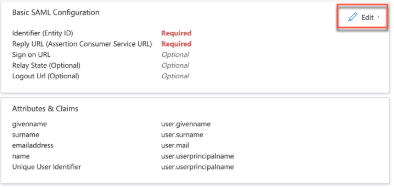
Enter the Identifier
Identifier (Entity ID)provided by Pismo. This is a unique identifier for the service provider (the application a user wants to access—in this case, Pismo Control Center), often a URL or a URN.
Note: this URL or URN is unique to each environment (one for production, one for test, and so on). -
Enter the URL provided by Pismo where Control Center will receive SAML assertions from the IdP into the
Reply URL (Assertion Consumer Service URL)field.
Note: this URL is unique to each environment (one for production, one for test, and so on).
-
-
Map Attributes—(e.g., email, first name, last name) from the IdP to the SP. The following attributes are required:
- Username—email address (string)
- Name—In Control Center, there is a single field for name and you can send anything you want for this field (first name + last name, first name only, display name and so on). (string)
- Email address—user email address (string)
-
Select Unique User Identifier—this is a default claim that is added when an app is created.
- Namespace— http://schemas.xmlsoap.org/ws/2005/05/identity/claims
- Source—Attribute
- Source attribute—user.email
-
Download IdP metadata SAML certificate—Download then save the IdP metadata XML file. This is required for Control Center configuration.
Step 2: Send IdP configuration information to Pismo
You must send the IdP metadata XML file you downloaded in the previous step to Pismo. Do this through a secure Enhanced File Transfer (EFT).
- Pismo will send you an email invite to register to the EFT. Note: If you are already registered, connect to the online EFT Portal.
- Log in to your account using the email account and password you created when you registered to the EFT.
- Select the Shared with Me folder and then select the folder that was shared with you by Pismo.
- Upload the metadata XML file.
Step 3: Assign Roles in Control Center
With the optional package that allows you to set up Single Sign-On (SSO) authentication to Control Center, you can also set up role mapping in Control Center. Role-based access control (RBAC) enforces the principle of least privilege. With RBAC, users are granted only the minimum access necessary for their roles. Control Center users can be assigned to multiple roles, each with different permissions. If you have multiple organizations, your users can be assigned to different roles for each organization. For example, a user can be an Admin in organization 1 but an Accounts viewer in organization 2.
Integration flow with role mapping
Once you have configured the role mapping for your users, this is the authorization flow for users when logging in to Control Center:
- User logs in via the IdP.
- IdP sends an authentication token with attributes.
- Control Center reads the attributes:
- Identifies the user via email
- Determines access levels via the custom attribute
- Permissions are applied based on the received values.
To create the role mapping for your users, you need to provide SAML assertions. The assertions must be provided in a very specific format: OrgID/rolename (for example: TN-123456789/controlc-admin).
- OrgID is mandatory—This is because you may have more than one organization in Control Center and users can be assigned separate roles for each organization.
- Rolename must be the exact name of the role—Only those roles in the table above are allowed, you cannot add new roles or modify the pre-defined role names.
- You can send multiple roles in the SAML assertion—either as a semicolon-separated list in a single SAML attribute or as a multi-value SAML attribute.
Configure a user role in Entra ID
To enable Control Center to interpret access levels, you must configure a user role in Entra ID, which is a 4-step process:
- Create groups
- Add roles
- Assign roles to the groups
- Edit attributes and claims
Create groups
Create custom groups for Pismo roles and assign your team members (users) to these groups. You can assign a Pismo role to each group and you can add users to multiple groups.
- Log in to the Entra ID Dashboard.
- From the left navigation panel, select Groups.
- Select Add new group:
- Group type—select Security
- Group name—enter the name of the group (for example, Setup viewer)
- Select No members added and add users to the group
Add roles
Custom roles are not supported within Control Center. Role management is restricted to the following pre-defined roles. Refer to the Control Center User permissions and roles guide for permission details for each of the roles.
| Role | Role name |
|---|---|
| Accounts operator | controlc-accounts-operator |
| Accounts viewer | controlc-accounts-viewer |
| Admin | controlc-admin |
| API keys approver | controlc-api-approver |
| Auditor | controlc-auditor |
| Backoffice approver | controlc-backoffice-approver |
| Backoffice operator | controlc-backoffice-operator |
| Backoffice viewer | controlc-backoffice-viewer |
| Collections analyst | controlc-collection-analyst |
| Seller management admin | controlc-seller-mgmt-admin |
| Setup advanced | controlc-setup-advanced |
| Setup advanced viewer | controlc-setup-advanced-viewer |
| Setup approver | controlc-setup-approver |
| Setup operator | controlc-setup-operator |
| Setup viewer | controlc-setup-viewer |
| User manager | controlc-user-manager |
To create the role mapping for your users, you need to provide SAML assertions. The assertions must be provided in a very specific format: OrgID/rolename (for example: TN-123456789/controlc-admin).
- OrgID is mandatory—This is because you may have more than one organization in Control Center and users can be assigned separate roles for each organization.
- Rolename must be the exact name of the role—Only those roles in the table above are allowed, you cannot add new roles or modify the pre-defined role names.
- You can send multiple roles in the SAML assertion—either as a semicolon-separated list in a single SAML attribute or as a multi-value SAML attribute.
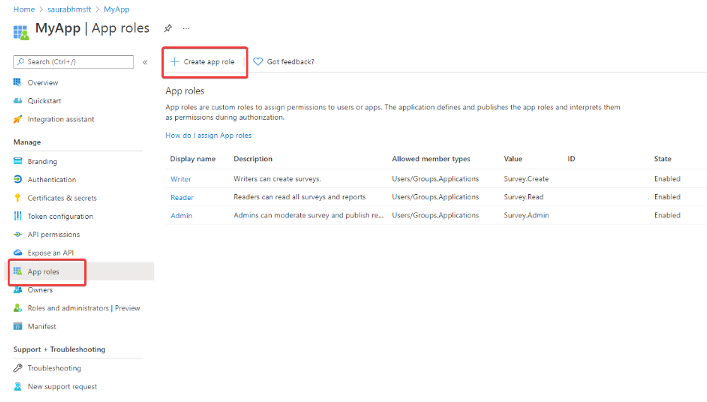
Take the following steps to add roles:
-
Go to Entra ID > App registrations.
-
Select the application you created for the Pismo Control Center.
-
Go to Manage > App roles.
-
Select Create app role.
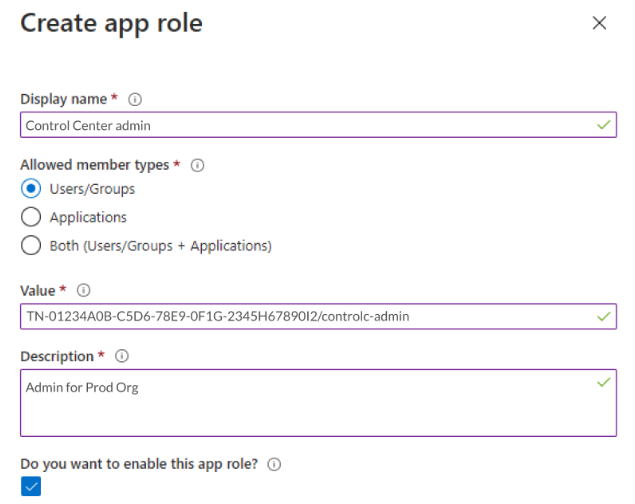
-
In the Create app role pane:
-
Add a Display name
-
Add Allowed member types
-
Add a Value—this value must follow the orgId/Role name pattern
-
Enter a Description
-
Select Apply.
-
-
Assign roles to Entra ID groups
- Go to Enterprise applications and open the App created for Pismo Control Center.
- Go to Manage > Users and groups.
- Select Add user and groups.
- Under Add users and groups select None Selected to add a group. A list of users and security groups displays.
- You can search for a group you created in the previous step and select the groups that display in the list. Choose Select to proceed.
- Under Select a role select None Selected. All the roles that you defined for the application are displayed.
- Select a role and choose Select .
- Select Assign to finish the assignment of users and groups to the app.
Edit attributes and claims
- Go to Manage > Single-sign on.
- In the Attributes & Claims section, select Edit.
- Add a new claim for the role:
- Name—ControlCenterRole
- Namespace—(if required) http://schemas.xmlsoap.org/ws/2005/05/identity/claims
- Source—Attribute
- Source attribute—user.assignedroles
- Save the configuration and ensure the claim is included in the token sent to Control Center.
Step 4: Finalize the configuration in the IdP
Once Pismo receives the metadata file, we will complete your configuration and notify you when the system is ready to test. Once you are notified that configuration is complete, do the following:
- Test the configuration.
- Ensure that user attributes are correctly mapped.
- Perform a test login to verify that SSO is working as expected.
- Enable SSO for users.
- Once testing is successful, notify Pismo and we will enable SSO for your users in your email domain.
- Add users into your IdP (refer to the next section for special considerations when creating users with SSO).
- Provide necessary documentation or training to your end-users on how to use SSO.
Considerations for creating users with SSO integration
There are some specific considerations for Control Center administrators when creating users with SSO integration. The main thing to keep in mind is that while you must initially create all your users in your IdP, you must manage Control Center users and user roles from the Control Center.
If you have a user in your IdP but you haven’t created a user for that person in the Control Center, this is what happens when they log into the Control Center for the first time using SSO:
- When a person without a defined user account in Control Center logs into Control Center for the first time, a user account is automatically created using Just-in-Time (JIT) provisioning from SAML.
- Since the newly assigned user does not yet have a role assigned, they will not have permissions to see anything in Control Center upon initial log in. They will be directed to a page telling them to reach out to their company Control Center admin to have roles assigned.
- As the company Control Center admin, you must log in to Control Center to assign the appropriate roles to the user.
- The next time the user logs into Control Center, they will have the correct access.
User deletion and revoking access to Control Center
Control Center users are not synced with users in your IdP. Therefore, Pismo does not get notified if user access is revoked in IdP. So, user deletion for Control Center is a two-step process.
First, you must revoke user access in your IdP. If users try to log in to Control Center again through SSO after their current session expires, Pismo revokes their access but does not delete the user.
Next, you need to delete the user in Control Center to remove the user, so that user does not count towards your user account limit. Note that users that were created in Control Center before the integration was turned on will still be shown as users in Control Center even If you never granted them access in your IdP.
Terms to know
| Term | Meaning |
|---|---|
| Identity Provider (IdP) | An Identity Provider is a trusted service that stores and authenticates a user’s identity. |
| Service Provider | The application a user wants to access, such as Pismo Control Center. |
| Security Assertion Markup Language (SAML) | SAML is an open standard authentication protocol that you can use to implement SSO in your Control Center org. SAML allows identity providers and service providers to securely exchange user information, enabling user authentication between services. |
| SAML Assertion | A SAML assertion, which is part of a SAML response, describes a user by asserting facts, like username or email address. During authentication, the identity provider signs the SAML assertion, and the service provider validates the signature. |
| SAML Request | When a user attempts to access the service provider, the service provider sends a SAML request asking the identity provider to authenticate the user. |
| SAML Response | To authenticate the user, the identity provider sends a SAML response to the service provider. The response contains a signed SAML assertion with facts about the user. |
Updated 4 months ago