
Setting up event filtering
Event filtering lets you control which events a subscribed event source receives. By default, subscribers receive all generated events. Use event filtering to enable or disable specific event types using pattern-based rules.
Event filtering can help you:
- Reduce unnecessary event traffic.
- Simplify downstream processing.
- Limit exposure of sensitive information when sharing events with partner organizations.
This guide explains supported filtering patterns, how to request a configuration change, and how to verify the implementation.
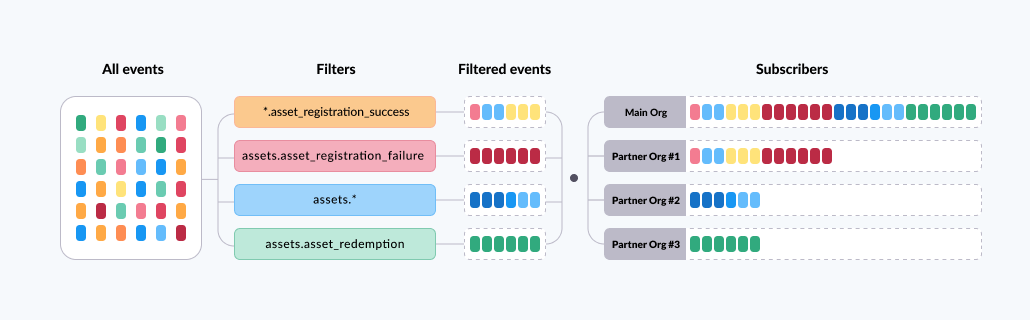
Why use event filtering
- Reduce noise — Receive only the events relevant to your business.
- Protect sensitive data — Prevent sensitive event data from being shared with partner organizations.
Supported filtering patterns
Use the following patterns to specify which events to enable or disable:
| Pattern | Meaning | Example |
|---|---|---|
*.<event_type> | A specific event type from any domain | *.succeeded |
<domain>.* | All event types from a specific domain | onboarding.* |
<domain>.<event_type> | A specific event type from a specific domain | transactions.created |
Open a service desk ticket
- Go to: https://pismolabs.atlassian.net/servicedesk/customer/portal/10
- Select Settings.
- Enter a short description of the request in the Summary field.
- In Category, select Data.
- In Sub-Category, select Event Filtering.
- Copy the template below into the Description field and replace the sample values with your information.:
CONFIGURATION REQUEST — Event Filtering
========================================

Org ID:            TN-xxxxxxxx-xxxx-xxxx-xxxx-xxxxxxxxxxxx
Environment:       Production / Sandbox
Requester Name:    Your Name
Contact Email:     [email protected]

Action:            Disable / Enable
  Disable = STOP sending these events
  Enable  = START sending these events (that were previously blocked)

Filtering Patterns (one per line):
  onboarding.*
  *.failed
  transactions.created

Apply to Partner Org?  No / Yes
Partner Org ID:        TN-xxxxxxxx-xxxx-xxxx-xxxx-xxxxxxxxxxxx
  (only if applying filter to a partner/additional subscriber org)
- When a Control Center request fails, the application automatically displays a popup message. You can add this message in the Report Log field.
- In Priority, select the appropriate priority level.
- In Environment, select the environment for the configuration.
- Select Send to submit the request.
Event filtering takes effect immediately after Pismo implements the request.
Need Pismo-specific details? Information such as Pismo's AWS Account ID, single-tenant SFTP endpoints, consumer role ARNs, or external IDs can be obtained from your Technical Account Manager (TAM) or the Implementation Engineer assigned to your project.
Troubleshoot event filtering
After Pismo confirms filters are applied, use the troubleshooting table below to identify and resolve common issues.
| Symptom | Likely cause | Fix |
|---|---|---|
| Still receiving disabled events | The filter has not been applied yet | Confirm with Pismo that the ticket is resolved |
| No events received | The filter is too broad | Check if *.* was used — this disables everything |
| Unexpected events are filtered | The filtering pattern contains an error | Verify domain/event_type names in Pismo documentation |
| Partner organization still receives events | The filter was applied to the wrong organization | Update the request with the correct organization ID |
| Events are intermittent | An unrelated infrastructure issue exists | Run the appropriate troubleshooting script for the integration |
Updated 3 months ago