Authentication with OpenID Connect
OpenID Connect for Servers is the preferred way to authenticate with the Pismo platform. It provides greater security guarantees in service communications than basic authentication using client credentials. In addition, OpenID Connect supports multi-tenancy. This means that, for example, you can give a third party access to only a specific set of endpoints within your organization.
Server authentication
During onboarding to production, you must generate at least one pair of public and private keys for OpenID authentication. Then, you must generate and sign a JSON Web Token (JWT) for each key pair that you generate. For more information about JWTs, refer to Generate your JWT.
- Use the OpenSSL toolkit to generate a private key and a public key, using the following commands:
Generate a private key:
  $ openssl genpkey -out rsakey.pem -algorithm RSA -pkeyopt rsa_keygen_bits:2048
Generate a public key based on the private key yougenerated:
  $ openssl rsa -in rsakey.pem -out rsa.pub -pubout -outform PEM
- Store your private key securely, and upload the public key to Control Center. For details on the upload process, refer to the Control Center OpenID Connect authentication guide.
- Generate your JWT using the private key associated with the pubic key you shared using the claims values here.
- Request an access token using the endpoint Get OpenID access token
The response to this call includes an access token that you can use with an API endpoint. If the response does not include an access token, your JWT might not be properly formed.
- Retrieve the access token returned in the Pismo response.
- Use this access token to make API calls.
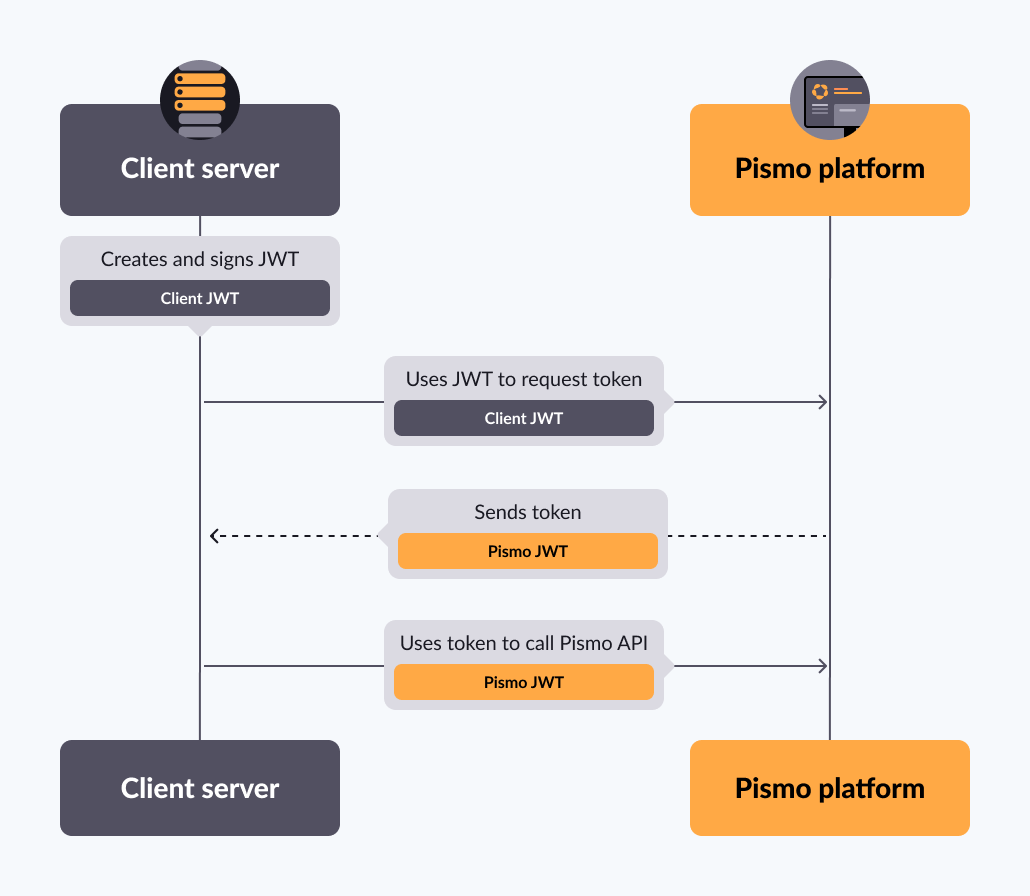
The following diagram illustrates steps 3 to 6:
Generate your JWT
Generate and sign a JWT using the private key you generated (in Step 1 above). This JWT should contain the following claims:
| Claim (key) | Type | Mandatory | Value | Description |
|---|---|---|---|---|
| alg | Fixed string value | Yes | RS256 | |
| typ | Fixed string value | Yes | JWT | |
| iss | Fixed string value | Yes | This is the verifier Issuer. This value is provided by Pismo, automatically generated by Control Center when a user creates a new credential. | |
| sub | Fixed string value | Yes | This is the verifier Subject. This value is provided by Pismo, automatically generated by Control Center when a user creates a new credential. | |
| aud | Fixed string value | Yes | This is the verifier Audience. This value is provided by Pismo, automatically generated by Control Center when a user creates a new credential. | |
| iat | Timestamp number | Yes | ex: 1697044489 | The current time in seconds since the UNIX epoch. |
| exp | Timestamp number | Yes | ex: 1697048089 | The time in seconds since the UNIX epoch at which the token expires. It can be a maximum of 3600 seconds later than the iat. |
| tenant_id | Fixed string value | Yes | ex: tn_example | The identifier of the tenant of the user. Value provided by Pismo, automatically generated by Control Center when a user creates a new credential. |
| uid | String value | Yes (refer to Endpoints that require an account-specific token) | ex: 123456 | The Account ID of the Pismo customer. If you want a token without Account ID, do not send the claim uid on the JWT. |
| pismo | Object type | Yes | ex: "pismo": { "group": "pismo-v1:sample-group:rw" }, | The identifier of the group that you want your token to have access to. A group has access to a certain subset of endpoints. You can find the list of valid groups on Control Center under the section API permission groups which is inside the Menu/Organization. Otherwise, contact your Pismo representative. For full details on API permission groups, refer to the API permission groups guide. |
| customClaims | Object type | No | "customClaims": { "custom1": "someValue", "userexample": "myusername" }, | Optional custom claims. |
Example of the structure of the JWT that you should generate on your side in order to use OpenID authentication:
Header
{
  "alg": "RS256",
  "typ": "JWT"
}

Payload
{
  "aud": "<value provided by Pismo>",
  "iss": "<value provided by Pismo>",
  "sub": "<Value provided by Pismo>",
  "tenant_id": "<Value provided by Pismo>",
  "pismo": {
    "group": "pismo-v1:some-samplegroup:rw"
  },
  "uid": "123123",
  "exp": 1724348241,
  "iat": 1724344641,
  "customClaims": {
    "custom1": "someValue",
    "userexample": "[email protected]"
  }
}
In the Payload example above, all values marked as "value provided by Pismo" are automatically filled in.
You can find the list of groups you can use in the Control Center. For details, refer to API permission groups.
uid is required on all endpoints that require an account-specific token.
To generate JWTs, we recommend you use one of the libraries provided at jwt.io. You can use any trusted helper library that is compatible with your stack.
The following code sample shows how to create a signed JWT in a few languages:
package main

import (
    "fmt"
    "time"

    "github.com/dgrijalva/jwt-go"
)

var mySigningKey = []byte(`
-----BEGIN PRIVATE KEY-----
...
-----END PRIVATE KEY-----
`)

func main() {

    key, err := jwt.ParseRSAPrivateKeyFromPEM(mySigningKey)
    fmt.Println(err)

    token := jwt.NewWithClaims(jwt.SigningMethodRS256, jwt.MapClaims{
        "iss":       "[email protected]",
        "aud":       "https://identitytoolkit.googleapis.com/google.identity.identitytoolkit.v1.IdentityToolkit",
        "exp":       time.Now().Add(time.Hour).Unix(),
        "iat":       time.Now().Unix(),
        "sub":       "[email protected]",
        "uid":       "12345678910",
        "tenant_id": "test-pbrj4",
    })

    // Sign and get the complete encoded token as a string using the secret
    tokenString, err := token.SignedString(key)
    fmt.Println(tokenString, err)

}
package com.star.sud;

import java.io.*;
import java.nio.charset.Charset;
import java.nio.file.Files;
import java.security.*;
import java.security.interfaces.RSAPrivateKey;
import java.security.spec.PKCS8EncodedKeySpec;
import java.time.Instant;
import java.util.*;

import io.jsonwebtoken.*;


public class JwtTokenwithRsa {

	//Reference to your private key
	public static final String PRIVATE_KEY_FILE_PATH = "RSA/rsakey.pem";

	public static void main(String[] args) {
		try {
			JwtTokenwithRsa tokenwithRsa = new JwtTokenwithRsa();
			tokenwithRsa.generateJWTWithRsa();

		} catch (Exception e) {
			e.printStackTrace();
		}
	}

	public String generateJwtToken(PrivateKey privateKey) {
		JwtBuilder builder = Jwts.builder().signWith(SignatureAlgorithm.RS256, privateKey);

		long issuedAt = Instant.now().getEpochSecond();
		long expiresAt = Instant.now().plusSeconds(3600).getEpochSecond();
		Map<String,String> pismoClaims = new HashMap<String,String>();
		pismoClaims.put("group","pismo-v1:samplegroup:rw");

		builder.claim("aud", "value provided by Pismo");
		builder.claim("sub", "value provided by Pismo");
		builder.claim("iss", "value provided by Pismo");
		builder.claim("exp", expiresAt);
		builder.claim("iat",issuedAt);
		builder.claim("pismo", pismoClaims);
		builder.claim("tenant_id", "Your Tenant ID");
		builder.claim("uid", "Account Id or Tenant Id");


		String token = builder.compact();
		return token;
	}

	public void generateJWTWithRsa() throws Exception {
		KeyPairGenerator keyGenerator = KeyPairGenerator.getInstance("RSA");
		keyGenerator.initialize(1024);

		File f = new File(PRIVATE_KEY_FILE_PATH);
		PrivateKey privateKey = readPrivateKey(f);


		// Generate Token
		String id = UUID.randomUUID().toString();
		String token = generateJwtToken(privateKey);
		System.out.println("TOKEN:");
		System.out.println(token);

	}

	public RSAPrivateKey readPrivateKey(File file) throws Exception {
		String key = new String(Files.readAllBytes(file.toPath()), Charset.defaultCharset());

		String privateKeyPEM = key
				.replace("-----BEGIN PRIVATE KEY-----", "")
				.replaceAll(System.lineSeparator(), "")
				.replace("-----END PRIVATE KEY-----", "");

		byte[] encoded = Base64.getDecoder().decode(privateKeyPEM);

		KeyFactory keyFactory = KeyFactory.getInstance("RSA");
		PKCS8EncodedKeySpec keySpec = new PKCS8EncodedKeySpec(encoded);
		return (RSAPrivateKey) keyFactory.generatePrivate(keySpec);
	}

}
To be released
To be released
Using the JWT to request an access token
After generating the signed JWT, you can use it to request an access token. This access token request is an HTTPS POST request.
Method: POST
Content-Type: application/json
Endpoint: {environment}/passport/v1/oauth2/token
Request body payload:
| Property Name | Type | Description |
|---|---|---|
| token | string | A custom token you use to request an access token. |
The following sample code shows a cURL POST request for an access token in the Pismo Sandbox:
curl --request POST \
--url https://sandbox.pismolabs.io/passport/v1/oauth2/token \
--header 'Content-Type: application/json' \
--data '{
"token":"eyJhbGciOiJSUzI1NiIsInR5cCI6IkpXVCJ9.eyJhdWQiOiI8dmFsdWUgcHJvdmlkZWQgYnkgUGlzbW8-IiwiaXNzIjoiPHZhbHVlIHByb3ZpZGVkIGJ5IFBpc21vPiIsInN1YiI6IjxWYWx1ZSBwcm92aWRlZCBieSBQaXNtbz4iLCJ0ZW5hbnRfaWQiOiI8VmFsdWUgcHJvdmlkZWQgYnkgUGlzbW8-IiwicGlzbW8iOnsiZ3JvdXAiOiJwaXNtby12MTpzb21lLXNhbXBsZWdyb3VwOnJ3In0sInVpZCI6IjEyMzEyMyIsImV4cCI6MTcyNDM0ODI0MSwiaWF0IjoxNzI0MzQ0NjQxLCJjdXN0b21DbGFpbXMiOnsiY3VzdG9tMSI6InNvbWVWYWx1ZSIsInVzZXJleGFtcGxlIjoidXNlckB1c2VyLmNvbSJ9fQ.TP8Awq4jgF_JcrhZkhumyifOka0uXmJ-yC5a9fO6WBHX6HBedDAy4vp2BfPsZveiKaa1cJj1ys1xbXnJsvZpXFgwglnY46Ru_jLskXiahBeZg1LIJtUJegf7wqSeUPB1ESTkGLoXEHZKHLH5PZ3FqCHfwz8Vb9pb7iBNe7PMJqMgK8k5TgeEyyN6C3hpk2rji13uj67HKxMQ9Ss8-axVOi5YH6OFmxxnvUPk-rQb_PN8NaM3yFL604FsVVyAtT1Mp1S2h1YShSRKCDWtBV2h0sLk3C3iKZdWsgo8AH64GgDRTZal9y4ewal2G4LbyuQwVfr1VJTZegdGOKKR7DX2PA"
}'
Handling the response
If the JWT is properly formed and your service has permission to perform the operation, then the JSON response from the authorization server should include an access token. The following is an example response.
{
  "access_token": "eyJhbGciOiJSUzI1NiIsImtpZCI6InNrSUJOZyJ9.eyJpc3MiOiJodHRwczovL2lkZW50aXR5dG9vbGtpdC5nb29nbGUuY29tLyIsImF1ZCI6ImRldi1na2UtN2E2NSIsImlhdCI6MTU3NjE4MDg4MSwiZXhwIjoxNTc3MzkwNDgxLCJ1c2VyX2lkIjoiY2FwaXRhb2FtZXJpY2FAcGlzbW8uaW8iLCJzaWduX2luX3Byb3ZpZGVyIjoiY3VzdG9tIiwiZXh0cmFfY2xhaW1zIjp7InRlc3QxIjoidGVzdDEiLCJ0ZXN0MiI6InRlc3QyIiwidGVzdDMiOiJ0ZXN0MyJ9fQ.LAv--CRbsZqDhlRXcpnZlyK403oU2i1__fFR7CZ-bgp5e4lF187r1W-9jpZCVLit-QhneHJiaySxlDTAiwYfUu6bpVPw0BaXT-GimmGi-MDudUX3R44VtdQPvOXUHgx43DDD1NsDOwDn5QtrA-pvrfyT-Ijs6GcH4R66XPYaIm_ASHSEPCupK0ZW6VFjiWx3goGtCKG-TQlaGyq-iQ_ZBRJksJf6xIN8bFC1HqODePm3yDbtum2hbxwuZGtBQ0DcgkH4in4TWKwe8qrk37cl5TOkRx1yyhh9Jkhigmu6NuTvCk6ic-aappIR2P9iBB-g3W33-HVutXqqWfd0DXQb5w",
  "refresh_token": "AE0u-NcsvZAKSuwq8Q4E7ZEE9NBmmio7-0JQASKqw8L2AWaFH9EIggs4wuzvE0nnVoC9",
  "expires_in": "3600"
}
Access tokens expire after one hour
Your application should catch the error generated when this happens. It can then generate another JWT, sign it, and request another access token.
Calling Pismo APIs
After your application obtains an access token, you can use it to make calls to a Pismo API on behalf of the given user account. To do this, include the access token in the authorization: Bearer header of each request, as example below.
curl --request POST \
  --url https://sandbox.pismolabs.io/service/v1/service/example/payment \
  --header 'Content-Type: application/json' \
  --header 'accept: application/json' \
  --header 'authorization: Bearer eyJhbGciOiJSUzI1NiIsImtpZCI6InNrSUJOZyJ9.eyJpc3MiOiJodHRwczovL2lkZW50aXR5dG9vbGtpdC5nb29nbGUuY29tLyIsImF1ZCI6ImRldi1na2UtN2E2NSIsImlhdCI6MTU3NjE4MDg4MSwiZXhwIjoxNTc3MzkwNDgxLCJ1c2VyX2lkIjoiY2FwaXRhb2FtZXJpY2FAcGlzbW8uaW8iLCJzaWduX2luX3Byb3ZpZGVyIjoiY3VzdG9tIiwiZXh0cmFfY2xhaW1zIjp7InRlc3QxIjoidGVzdDEiLCJ0ZXN0MiI6InRlc3QyIiwidGVzdDMiOiJ0ZXN0MyJ9fQ.LAv--CRbsZqDhlRXcpnZlyK403oU2i1__fFR7CZ-bgp5e4lF187r1W-9jpZCVLit-QhneHJiaySxlDTAiwYfUu6bpVPw0BaXT-GimmGi-MDudUX3R44VtdQPvOXUHgx43DDD1NsDOwDn5QtrA-pvrfyT-Ijs6GcH4R66XPYaIm_ASHSEPCupK0ZW6VFjiWx3goGtCKG-TQlaGyq-iQ_ZBRJksJf6xIN8bFC1HqODePm3yDbtum2hbxwuZGtBQ0DcgkH4in4TWKwe8qrk37cl5TOkRx1yyhh9Jkhigmu6NuTvCk6ic-aappIR2P9iBB-g3W33-HVutXqqWfd0DXQb5w' \
  --data '{< JSON body the service expects to receive>}'
Updated 1 day ago